Well, there is a SUPER cool technique for making your own transparencies that I discovered years ago, that doesn't require buying expensive transparency film and running it through your printer...)
I've never done a tutorial, but, I thought I would give it a shot. Ready? (don't worry...it's really, really easy and fun!)
ok...
STEP 1: gather together scissors, a large spoon, a bowl of hot water, some ordinary packing tape and some pictures cut out of a magazine, newspaper, photocopy or laser copy (don't even THINK about using ink jet, though...) (my pictures are from Martha Stewart magazine from eons ago):
 STEP 2: cut out the picture you want, remembering that even the background will transfer to the tape, so, you can fussy cut it if you really must...I kinda liked the background, so, I just left it as is:
 STEP 3: cover the FRONT of the picture with packing tape, overlapping the tape peices slightly. (oh, also, beware: the picture's gonna want to jump up at the tape, in a static-electricity kind of way, so try to kind of hold the picture down with your other fingers while putting the tape on it! And don't panic if your tape goes on crookedy, or you get wrinkles, or anything like that...just make sure the surface is covered with tape and burnish the heck out of those wrinkles and you'll be fine)
 I put it over a piece of dark cardstock so you could kinda see the tape with all my grimy fingerprints on it (don't worry about those!)

 STEP 4: using the back of a large spoon, burnish the tape to the picture
Trim off the excess tape:
STEP 4: using the back of a large spoon, burnish the tape to the picture**actually, this step is optional. I tried it without burnishing, and it seemed to work out the same, so...in my lazy opinion...you can totally cut this step out and proceed to #5, as long as you're not the stickler type...and if you are the stickler type, well then...burnish away!

STEP 5: soak your paper in HOT water for, oh, 5-10 minutes (or more if you run off to check whats happening on Project Runway and loose track of time....)
 (don't worry when it curls in on itself, it won't stay that way...)

STEP 5: soak your paper in HOT water for, oh, 5-10 minutes (or more if you run off to check whats happening on Project Runway and loose track of time....)
(don't worry when it curls in on itself, it won't stay that way...)STEP 6: Now for the fun part! Take your picture out of the water and lay it on a flat, smooth surface, like a kitchen counter.(For picture taking purposes, I did mine on a plate cuz my kitchen counters are circa 1962, and soooo not pretty....)
Now, with the pad of your finger, start rubbing in one spot on the back of your picture. The paper backing will begin to peel away...

Keep rubbing, pulling the paper out towards the edges untill you've rubbed off all the paper and you can see the picture (how cool is THAT?). At this point, I wash it off in the water again, and then continue to rub a little, to get all the little pesky white fibers left behind. Hold up the picture and you'll notice cloudy whitish areas if you haven;t gotten them all off. You sticklers can just rinse and rub untill you're satisfied you got it all off.
 And here it is, all clean:
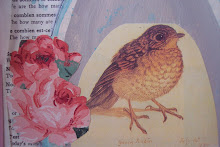
 Here, I've layered it on a peice of vintage school paper, so you can see that amazing handwriting done with purple ink:
 And here it is on a peice of sheet music:
 Here are some of the others I did from the original page of birdhouses:
 Now, these do have a wee bit of tackiness to the tape, probably depending on what kind you use, so keep that in mind when you're putting it on different backgrounds.
Now, with the pad of your finger, start rubbing in one spot on the back of your picture. The paper backing will begin to peel away...
Keep rubbing, pulling the paper out towards the edges untill you've rubbed off all the paper and you can see the picture (how cool is THAT?). At this point, I wash it off in the water again, and then continue to rub a little, to get all the little pesky white fibers left behind. Hold up the picture and you'll notice cloudy whitish areas if you haven;t gotten them all off. You sticklers can just rinse and rub untill you're satisfied you got it all off.
And here it is, all clean:Here, I've layered it on a peice of vintage school paper, so you can see that amazing handwriting done with purple ink:And here it is on a peice of sheet music:Here are some of the others I did from the original page of birdhouses:Now, these do have a wee bit of tackiness to the tape, probably depending on what kind you use, so keep that in mind when you're putting it on different backgrounds. You can store them on a peice of plain copy paper, but, they may stick, so it's probably best to store them on something slick, like an old clear transparency, or a peice of plastic film from your art supply packaging.
Oh, DO try this at home! And, if you do, tell me all anout it! I would LOVE to see pictures, too. Leave a comment or email me at littlejunkshop@yahoo.com
Happy transfer making!
***Next post, I will show you some of the projects I have made with these cool transfers!

 Here's the quote from one of the new pages, something I read in a magazine years ago, that stayed with me, despite my bad memory...The picture is my great-grandmother and my uncle


 This one says "Those who are willing to be vulnerable move among mysteries" Theodore Roethke